Intro to Elementor Custom Carousel Shortcode
Elementor comes bundled with the Swiper JS library, that’s how it handles carousels. It’s possible to use this existing resource, to build your own custom carousel.
Building a custom carousel in Elementor is sometimes necessary. And if you care about being resourceful as I do at times, you can use the existing Swiper JS Library included in Elementor.
Whenever there’s a carousel on the page, Elementor knows to initialize it. However, when adding your own carousel, not using Elementor’s Carousel Widget, you’ll have to initialize the carousel yourself, with a little JavaScript. You can also use the Swiper API to add features to your carousel that aren’t possible in Elementor, but exist in the library.
There are two things to do in order to get a basic carousel up on any page, as long as Elementor is installed. You can do them in any order, it can also be done with the free version of Elementor.
- Add the necessary HTML for the carousel
- Add the necessary JavaScript to initialize the carousel.
- Enqueue a new JS file in your functions, with Swiper as a dependancy
- Modify the JS file to configure the carousel, i.e, responsive breakpoints.
We’ll take it further, and create a shippable feature for a client’s website.
- Use ACF to Manage the Content, inside an Option page
- Wrap our carousel in a Shortcode
Adding the necessary HTML
Add a new HTML widget, or simply place this anywhere:
<!-- Custom Elementor Carousel HTML -->

<!-- First let's choose an ID -->
<div id="my_custom_swiper">

<!-- Required, slider main container -->
<div class="swiper-container">

<!-- Additional required wrapper -->
<div class="swiper-wrapper">

    <!-- The slides -->
    <div class="swiper-slide">Slide 1</div>
    <div class="swiper-slide">Slide 2</div>
    <div class="swiper-slide">Slide 3</div>

</div>
</div>
</div>
Add the necessary JavaScript
JS carousel libraries need to first initialize a specific Carousel. This is how the elements in the carousel are targeted, to change their classes to active, adjust the width and height, along with other options.
Basically, you have to tell your website to initialize the new carousel, targeting it by its element ID.
A Child Theme is recommended, you can use a plugin like Child Theme Configurator to make one quickly. You may also use a PHP Snippet plugin.
Below is a snippet for enqueuing a JS file with swiper as a dependancy.
Credits to Toan Khanh Nguyen for writing this on Medium article on hacking the Elementor Carousel.
Add this to your Child Theme’s function.php
// Enqueue Custom Swiper To Initialize a new Carousel
function load_more_scripts() {
wp_enqueue_script( 'carouseljs', get_theme_file_uri( 'assets/js/custom.js' ), ['jquery', 'swiper'], '', true );
}
add_action('wp_enqueue_scripts', 'load_more_scripts');
Next, create the new JavaScript file we just included. Place it in your child theme like this, child-theme/assets/js/custom.js
Inside custom.js, you need only this code to minimally get the carousel working.
var mySwiper = new Swiper('#my_custom_swiper .swiper-container', {
});
That should be enough to start swiping.
It is satisfying when the carousel is swipeable for the first time.
I ended up doing a lot more to my carousel. It was for a list of digital characters. So if you follow along you’ll be able to do more to your minimalist Elementor carousel, like:
- Style the carousel
- Add navigation arrows
- Make it responsive
- Loop over carousel items with Advanced Custom Fields
- Place the carousel with a shortcode.
You can add your HTML manually by editing the code, or as I’ve done, you can use an ACF repeater field to manage the content of the carousel, and loop over each carousel item.
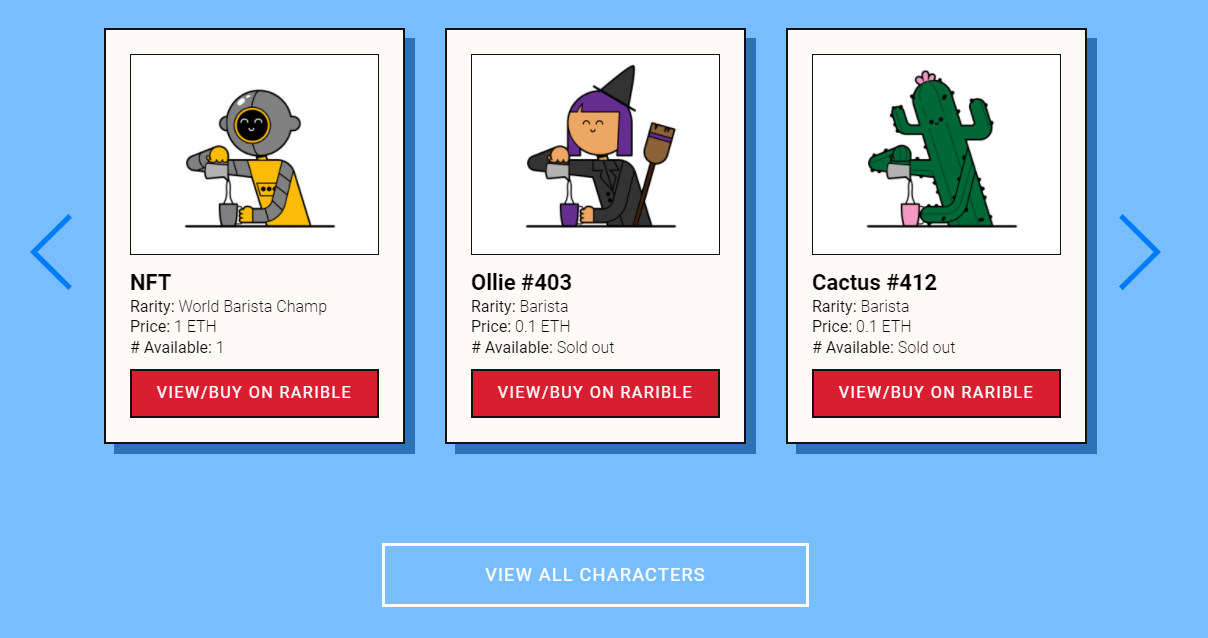
The carousel I made ended up like this.

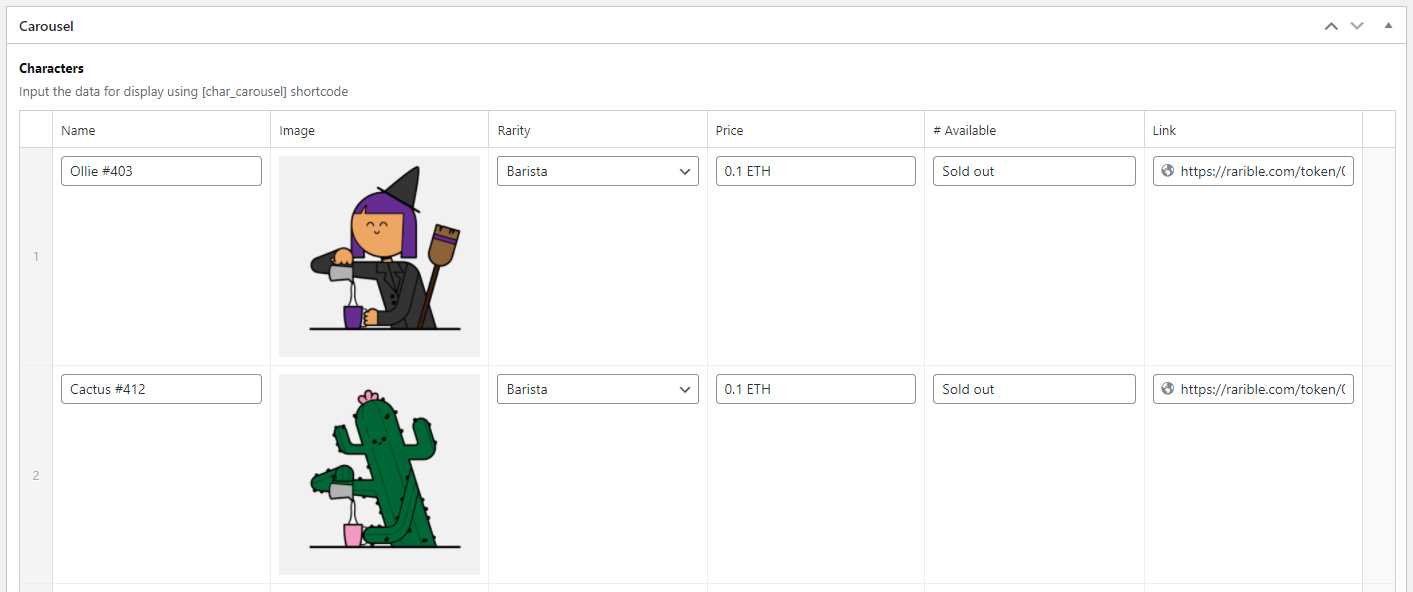
The backend, in an Options page in WordPress, carousel items are added with a repeater field, which looks like this.

The first thing we have to do is use some options from the SwiperJS API. Here’s what my code looked like.
var mySwiper = new Swiper('#char_swiper .swiper-container', {
    slidesPerView: 1,
    spaceBetween: 10,
	loop: true,
	loopedSlides: 4,
    navigation: {
        nextEl: '#char_swiper_arrows .swiper-button-next',
        prevEl: '#char_swiper_arrows .swiper-button-prev',
    },
    breakpoints: {
        640: {
          slidesPerView: 1,
          spaceBetween: 20,
        },
        768: {
          slidesPerView: 2,
          spaceBetween: 40,
        },
        1024: {
          slidesPerView: 3,
          spaceBetween: 0,
        },
    }
});
You can use most of the options found in the Swiper JS documentation.
The additions to the JavaScript above does a few things, like loop the carousel, and add responsive breakpoints.
Using ACF Repeater Fields to manage the carousel’s content
Next I used Advanced Custom Fields (Pro Version) to create Repeater Fields for managing the carousel’s content. After installing and activating ACF, it helps to create a new blank folder in your child theme, called acf-json, this will automatically register your fields, and make processing faster.
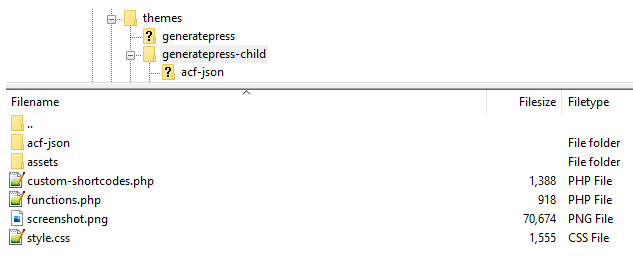
Here’s what the child theme looks like so far, the site was using GeneratePress.

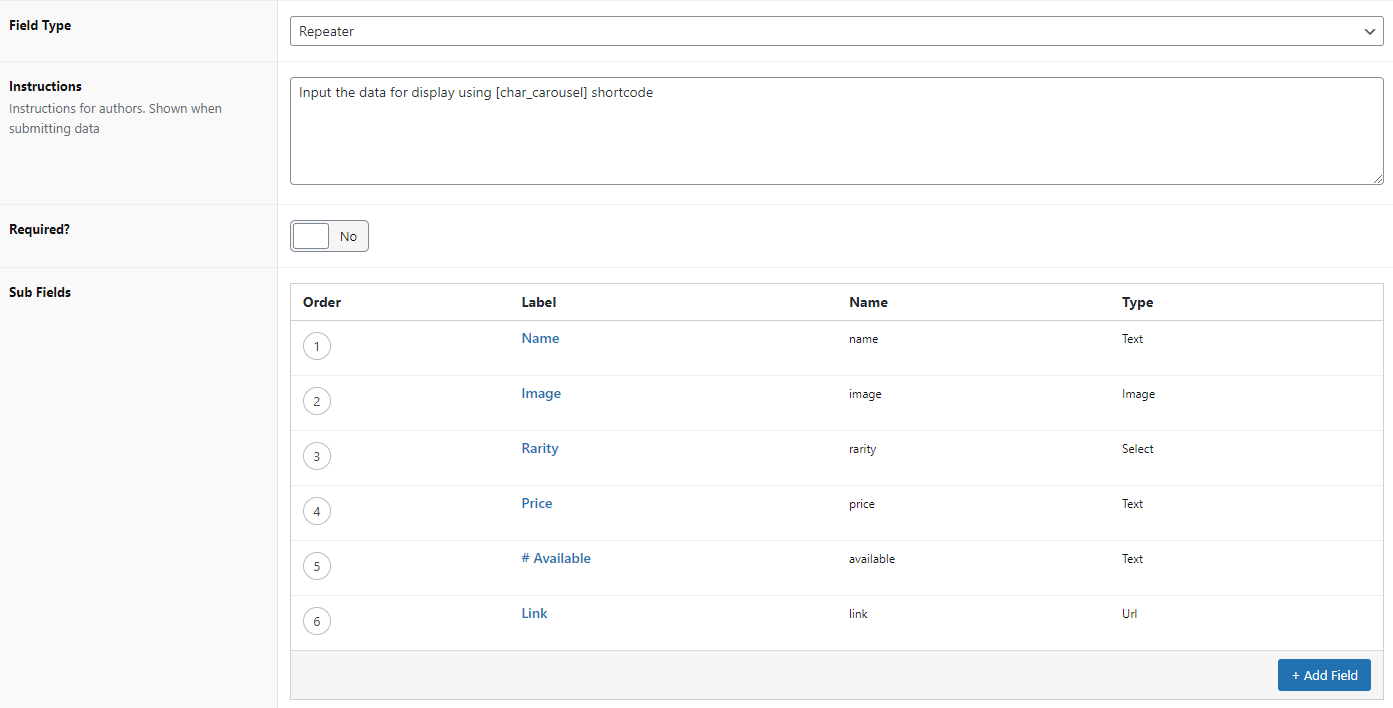
I created a new field group called Carousel, and added a new Repeater Field called Characters. For each Repeater Row, I added sub-fields, like Image, Title, Link, based on what the design needed. Here’s what I ended up with in ACF.

I also created an ACF Options page. Making one is simple, just add this snippet in your functions.php
// Create Advanced Custom Fields Options Page
if( function_exists('acf_add_options_page') ) {
	acf_add_options_page();
}
With the Options page in place, you can now use ACF’s conditionals to display the repeater field in it.
Making the Shortcode
We’ll need to create a shortcode, that’s where we’ll call back our custom field data and loop over our carousel items.
First, create a custom-shortcodes.php in the root of your child theme.
Include the new shortcode file in functions.php.
// Include Custom Shortcodes
include('custom-shortcodes.php');
Now we can build shortcodes in custom-shortcodes.php and they’ll automatically be usable.
I was having trouble with using echo in my shortcode, it was making my ACF shortcode data appear in the backend when editing pages. With some experimenting I ended up starting my shortcode with ob_start() and ending it with ob_end_clean().
I also let WordPress' native handling of images, so our carousel images will have source data and be responsive.
Here’s what my custom-shortcodes.php ended up like:
<?php
// Create a shortcode which loops over our ACF repeater fields and for our carousel
function char_shortcode_function() {
ob_start();
// Check if rows exists.
	if( have_rows('characters', 'option') ):
	?>
	<div id="char_swiper">
	<!-- Swiper Navigation -->
	<div id="char_swiper_arrows">
  		<div class="swiper-button-prev"></div>
   		<div class="swiper-button-next"></div>
	</div>
	<!-- End Swiper Navigation -->

	<div class="swiper-container">
	<div class="swiper-wrapper">
	<?php
   	// Loop through the rows.
    while( have_rows('characters', 'option') ) : the_row();
	$image = get_sub_field('image'); // We make sure we select ID as our output for our Image field in ACF
	$size = 'large'; // (thumbnail, medium, large, full or custom size)
	?>
		<div class="swiper-slide each">
		<div class="inner">
		<div class="content">
		<?php
		if ( $image ) {
    	echo wp_get_attachment_image( $image, $size );
		}?>
		<h3 class="name">
		<?php the_sub_field('name'); ?>
		</h3>
		<ul>
		<li><span class="label">Rarity:</span> <?php the_sub_field('rarity'); ?></li>
		<li><span class="label">Price:</span> <?php the_sub_field('price'); ?></li>
		<li><span class="label"># Available:</span> <?php the_sub_field('available'); ?></li>
		</ul>
		<a href="<?php the_sub_field('link'); ?>">View/Buy on Rarible</a>
		</div>
		</div>
		</div>
	<?php
    // End the loop.
    endwhile;?>
	<!-- Closing Div Tags -->
	</div></div></div>

	<?php
	endif;
  	$results = ob_get_contents();
  	ob_end_clean();
  	return $results;
}

// Register our shortcode to be [char_shortcode]
add_shortcode('char_shortcode', 'char_shortcode_function');
?>
Now you can place [char_shortcode] on any page in your Elementor site to display the carousel. And managing the items in it later is easy.
I quickly wrote some CSS to style my carousel and its items. Here is the style I wrote for this carousel.
#char_swiper {
	padding: 0 64px;
	position:relative;
}

.swiper-button-next, .swiper-button-prev {
	width:47px;
	height:76px;
}

#char_swiper .swiper-container .swiper-wrapper .each .inner {
	margin:20px;
	background-color:#fffaf5;
	border: 2px solid #111;
	padding:24px;
	box-shadow: 10px 10px #2d71b6;
}

#char_swiper .swiper-container .swiper-wrapper .each .inner .content img {
	background-color:#fff;
	border: 1px solid #111;
	padding: 0 24px;
}

#char_swiper .swiper-container .swiper-wrapper .each .inner .content a {
	background-color: #d81f31;
	border: 2px solid #111;
	padding: 12px 0;
	display:block;
	text-align:center;
	color:#fff;
	font-size:1rem;
	text-transform:uppercase;
	letter-spacing:1.5px;
}

#char_swiper .swiper-container .swiper-wrapper .each .inner .content ul {
	list-style:none;
	margin-left:0;
	margin-bottom:0.7em;
}

#char_swiper .swiper-container .swiper-wrapper .each .inner .content ul li {
	font-weight:300;
	font-size:16px;
	color:#000;
}

#char_swiper .swiper-container .swiper-wrapper .each .inner .content ul li .label {
	font-weight:400;
}

#char_swiper .swiper-container .swiper-wrapper .each .inner .content .name {
	margin-top:10px;
	margin-bottom:0;
	font-weight:700;
	font-size:22px;
	color:#000;
}
Here is the result.

Debugging
Anytime you’re working with PHP in WordPress, you’re hopefully working with debug enabled. Since WP is robust in its debugging, you’ll be glad whenever it logs an error.
On many sites the logging is already enabled.
You can look for the error log in /wp-contents/debug.log - the last modified date of this file is suggestive too. You can safely delete this file too, it will be regenerated.
To ensure debugging is on, look for, or add this code to wp-config.php
define( 'WP_DEBUG', true );

